Monday, 7 October 2013

Understanding Content Type Hub (CTH) in SharePoint 2013/2010

Content Type Hub (CTH) in SharePoint 2013

In this article, I would like to make a step by step walk through of creating Content Type Hub in SharePoint 2013. Topics I would like to cover in this blog are:
  1. What is a Content Type?
  2. What Content Type takes with/includes in it?
  3. What is Content Type Syndication?
  4. What is Content Type Hub?
  5. How to set up Content Type Hub in your Farm?


What is a Content Type: 

According to Microsoft, A content type is a reusable collection of metadata (columns), workflow, behavior, and other settings for a category of items or documents in a Microsoft SharePoint Foundation 2010 list or document library. Content types enable you to manage the settings for a category of information in a centralized, reusable way. For example, imagine a business situation in which you have three different types of documents: expense reports, purchase orders, and invoices. All three types of documents have some characteristics in common; for one thing, they are all financial documents and contain data with values in currency. Yet each type of document has its own data requirements, its own document template, and its own workflow. One solution to this business problem is to create four content types. The first content type, Financial Document, could encapsulate data requirements that are common to all financial documents in the organization. The remaining three, Expense Report, Purchase Order, and Invoice, could inherit common elements from Financial Document. In addition, they could define characteristics that are unique to each type, such as a particular set of metadata, a document template to be used in creating a new item, and a specific workflow for processing an item.

What a content type includes in it: Content Type in SharePoint includes following details with it:

  • The metadata, or properties, you want to assign to this type. These are represented by site columns added to the list or document library when you add the content type. For more information, see Columns.
  • Custom New, Edit, and Display forms to use with this content type. For more information, see Custom Information in Content Types.
  • Workflows available for items of this content type. These can be defined to start automatically based on a selected event or condition, or through user selection. For more information, see the Workflow Associations property.
  • For document content types, the document template on which to base documents of this type. For more information, see Document Template Element (Content Type).
  • Any information necessary for custom solutions that are associated with this content type. You can store this information in the content type as one or more XML documents. For more information, see Custom Information in Content Types.

What is Content Type Syndication:

It is new feature that is part of the Managed Metadata service in SharePoint 2010. It solves a long-standing problem from SharePoint 2007, which is how do I create an enterprise library of content types and synchronize them amongst many different site collections. We often had to design and build solutions to work around this issue in SharePoint 2007, but now we have something that we can use out of the box.
In moss 2007, you have a Site Collection in Web Application1 and you have created a series of content types to use. Now, you create Web Application2 and find the necessity to reuse the content types created in Web Application 1. There is no way you could share or reference those content types created in Web Application1 in Web Application2. The only way possible is to create or write an application which would install those content types. This situation is pretty common in large organizations. This can be even considered for exposing base content types you use across multiple web applications in the farm.

What is Content Type Hub:

SharePoint 2010 introduced a new feature called Content Type Hubs to solve it. Content Type Hub is a central location where you can manage and publish your content types – so now web applications can subscribe to this hub and pull down the published content types from the hub. Even receive updates on the published content types. Don’t you think it is of great value? Same feature continues to be in SharePoint 2013.

Provisioning a site to be Enterprise Metadata hub site for your Farm: 

Given is the step by steps approach to provisioning a site for CTH. Just follow the steps and you are done.

1. Create a web application and a root site collection.
2. Create a new root site collection for the new web application. I choose developer site template. I think we can go for any templates available.
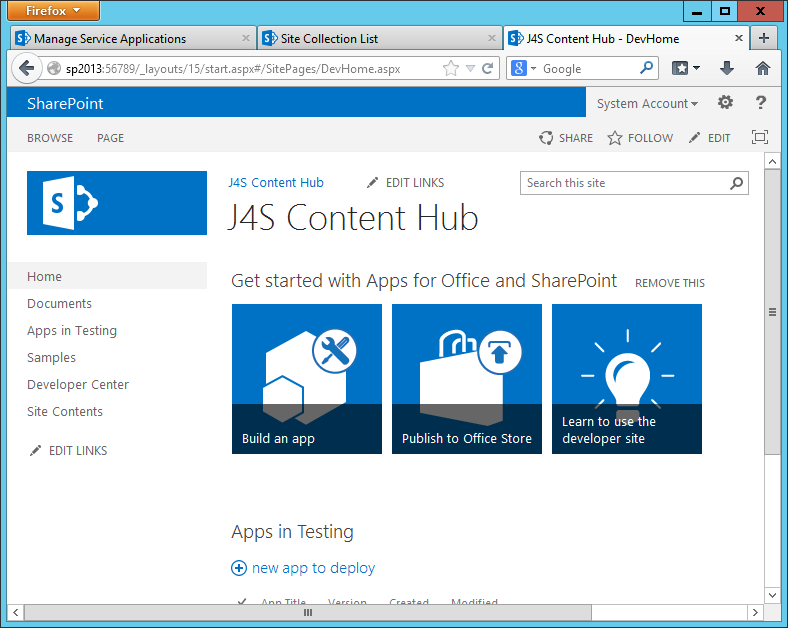
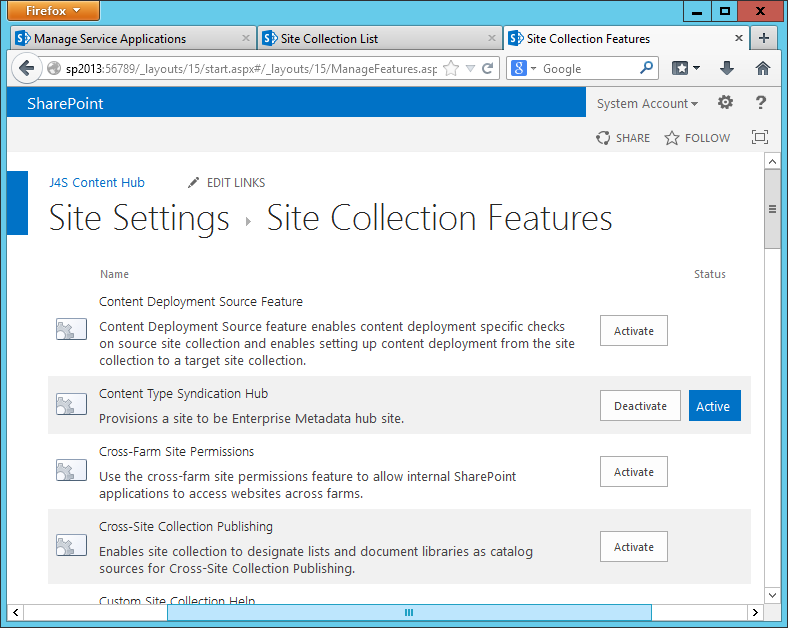
3. Activate the “Content type syndication Hub” of the site collection. Go to Site Settings -> Site Collection Features 
4. Activate Content type syndication hub site collection feature. What is being done is provisioning a site to be Enterprise Metadata hub site.
5. Setting up Managed metadata service in Manage Service Applications from Central Administration.
5.1. Go to Central Administration, click the Application Management, under Service Applications, and click the Manage Service Applications. In my case link was http://sp2013:xxxx/applications.aspx


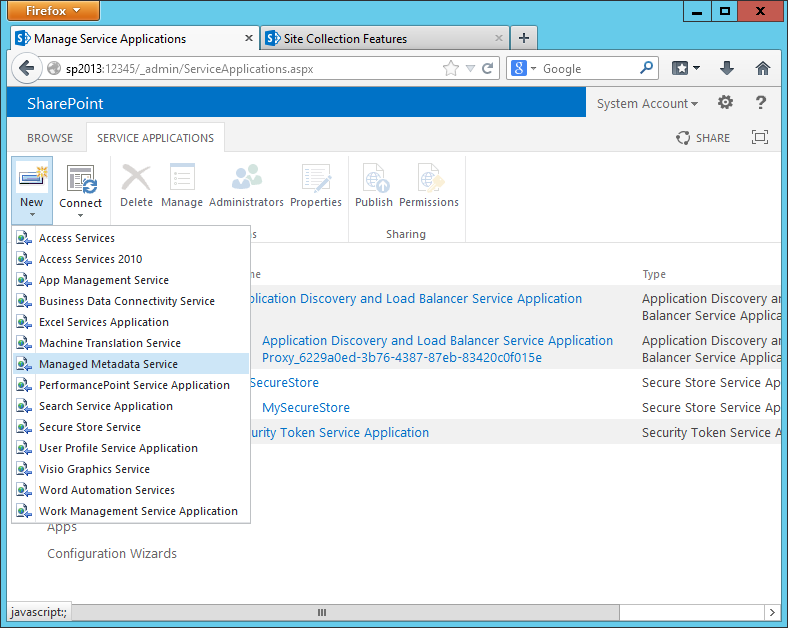
5.2. Creating a new Managed Metadata Service using ribbon button. 
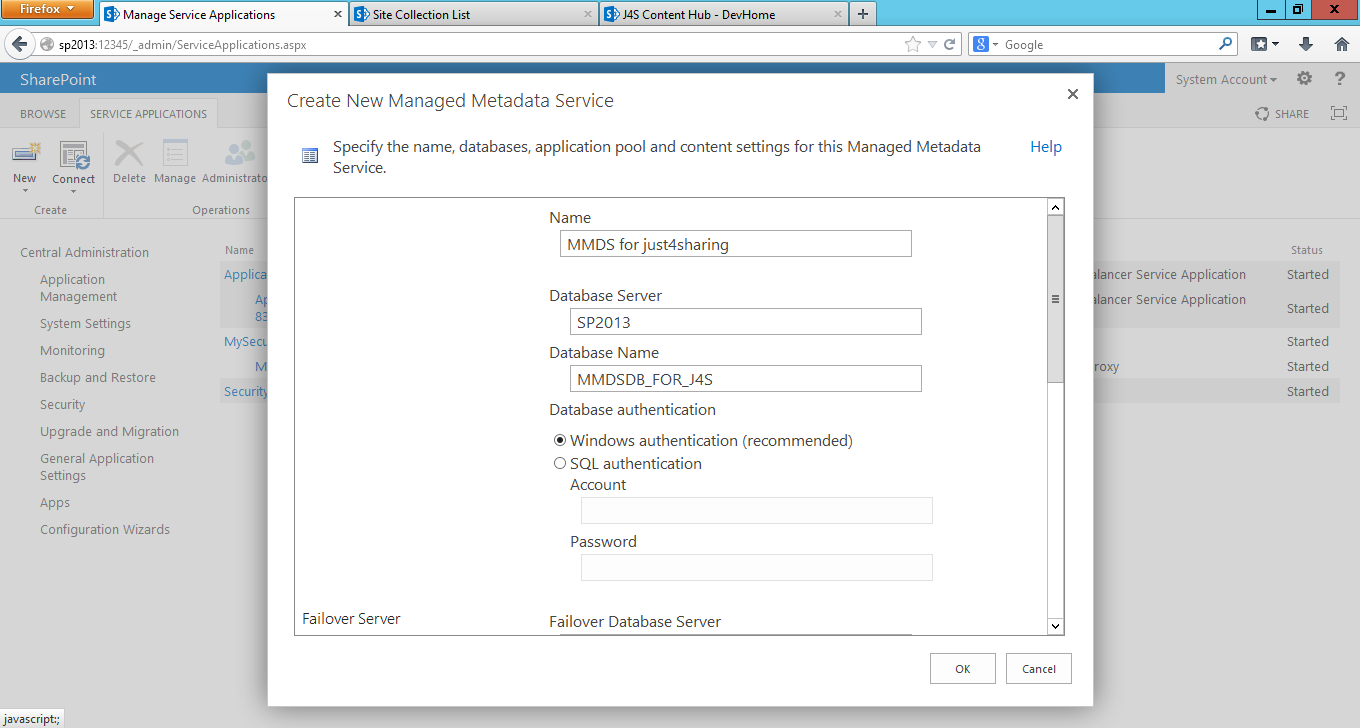
5.3. Adding required field values in the service creation dialog

5.4. Entering Content Type Hub URL
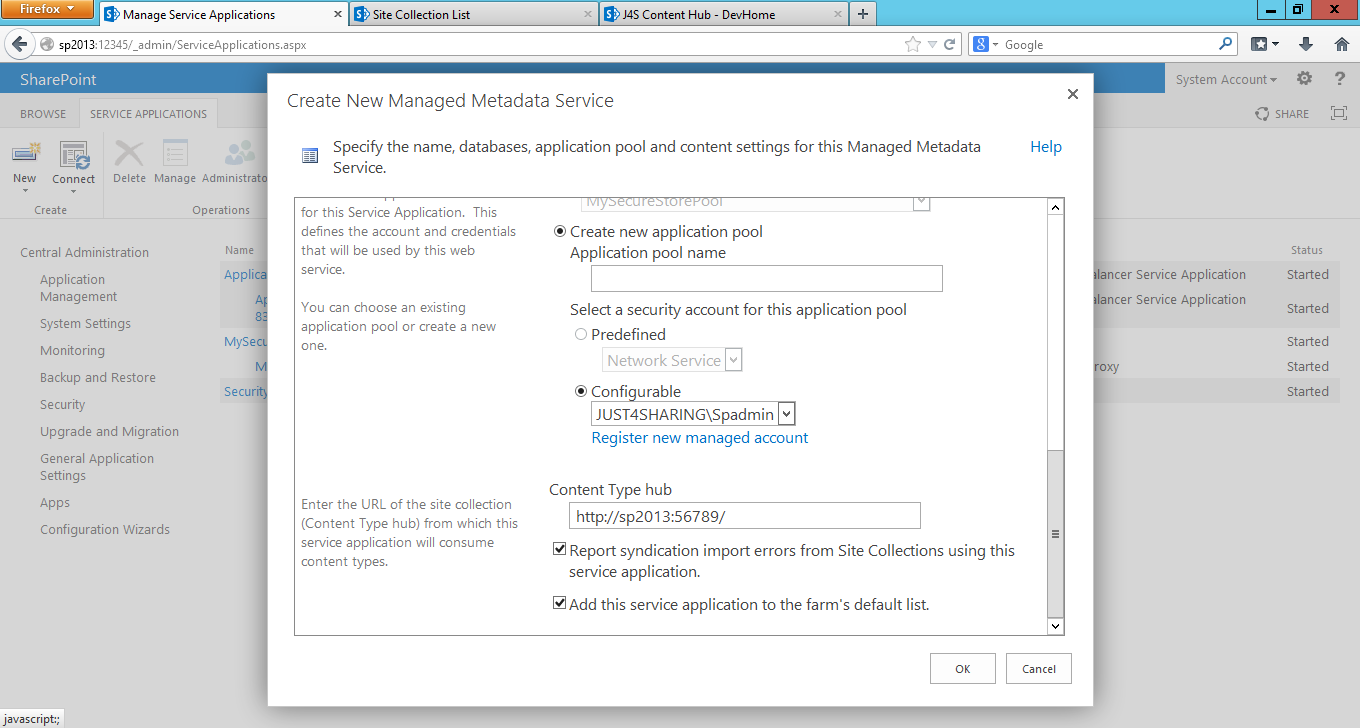
5.5. New Managed metadata service and its connection are ready
5.6. Click on the Managed Metadata service. Make sure there is not error. I met with an error when I clicked. Solve the issues and go ahead. The error, I encountered is given below
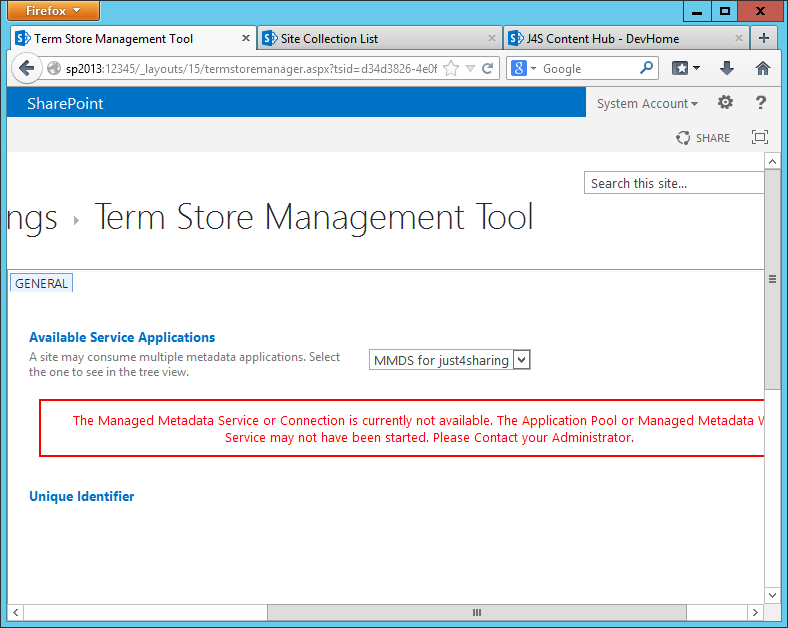

This blog helped me to solve my issue. Hope this might help you as well.
5.7 Check if Metadata service is started or not
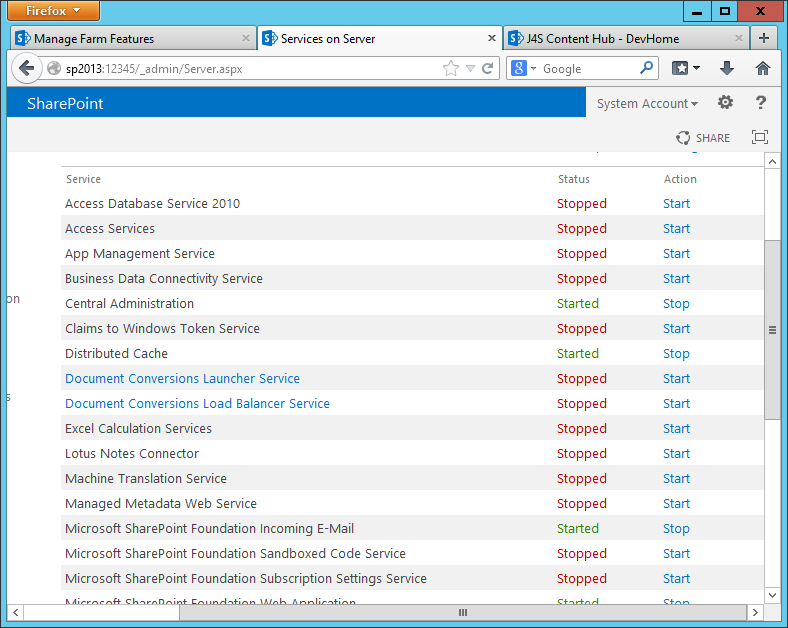
5.8 If not running, start it


5.9. Verify the properties of the Managed metadata service are entered properly especially Content Type Hub URL. Also tick the box below as shown in figure and Click OK.


5.10 Now select the Managed Metadata Service Connection, and then click Properties as shown below. What is important is “consume content type from the content type gallery”
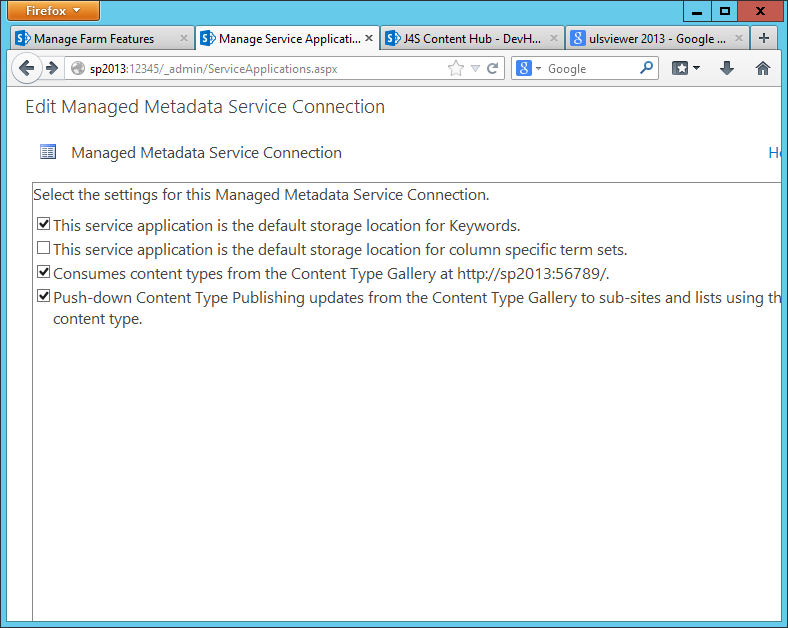


6) Now, go to our content type hub site [which created in first step], Go to Site Actions and then Site Settings. Under Galleries click on Site Content Types, you will find default Content Type Available.
8) Create a new content type so that we get a clear picture of what is happening
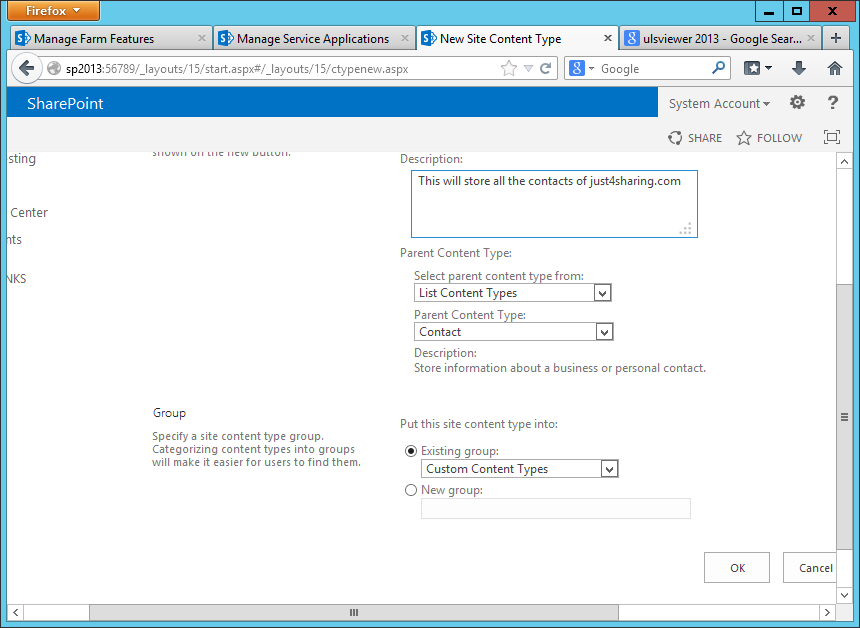
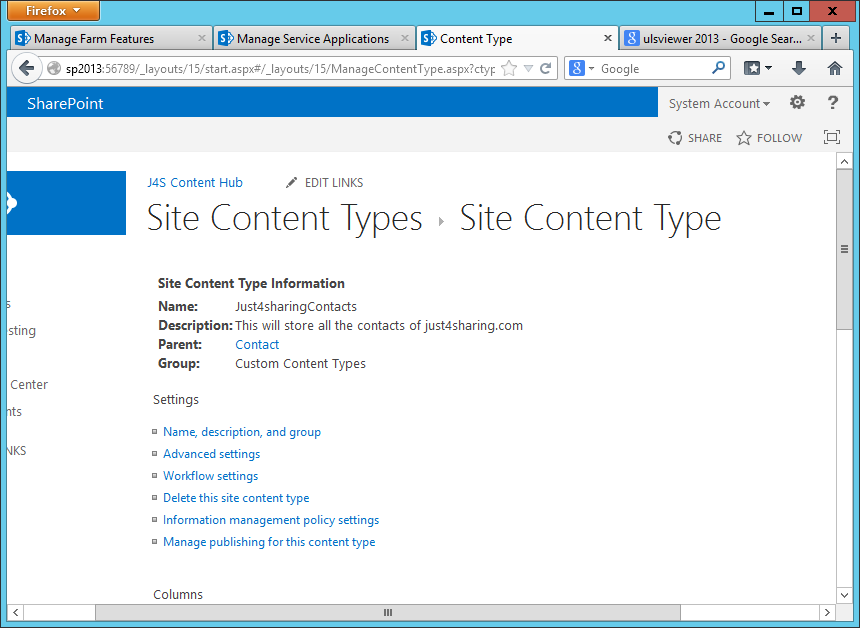
9. Click on the new content type and you can see all the new fields added and any other options attached to the content type.
10) Click the Manage content type publishing and Check the Publish Radio button and say OK.
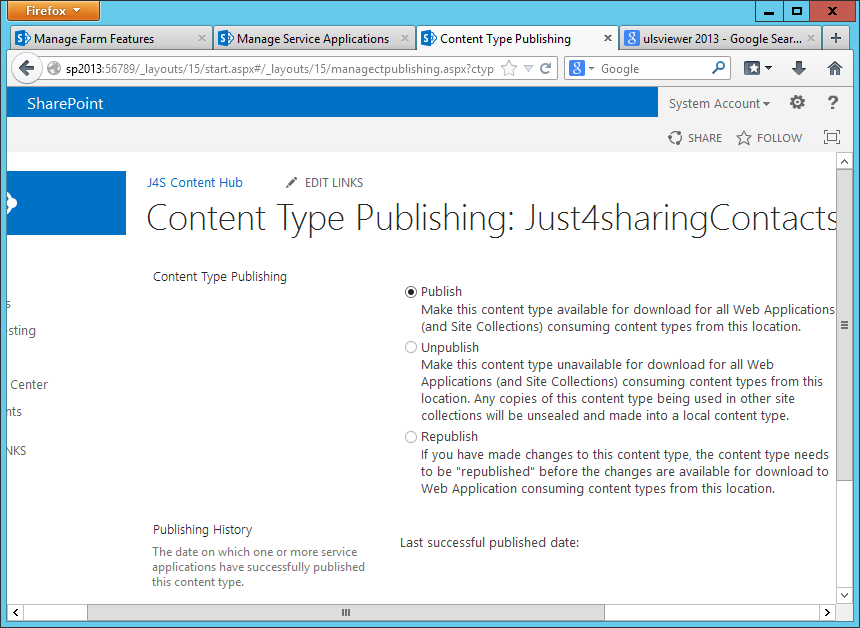
11) This will publish the content types
In order to receive the published content types immediately in the subscribers, you can go and run two timer jobs immediately: Go to Central Admin and run the timer jobs

11. 1) Content Type Hub


11.2) Content Type Subscriber (of the web application which is going to receive the content type’s updates)


11.3) Verify the time job status in the Central Admin

12. Published Content Types

After running the timer jobs, the content types should be published. Go to Site Settings | Site Collection Administration | Content Type Publishing. Check the Refresh all Published Content types on next update and say OK.
13. To verify the published Content Types

13.1 Create a Site collection of same or different Web Application
13.2 Go to the Site Actions -> Site Settings. Under the Galleries click the Site Content Types you will be finding the Site Content type which we created in above Site Collection.
14. By default, content type in the subscriber site collection is read only.
15. In Content Type Hub site collection you can do all kinds of setting to the content type including the workflow setting, Information policy setting etc.
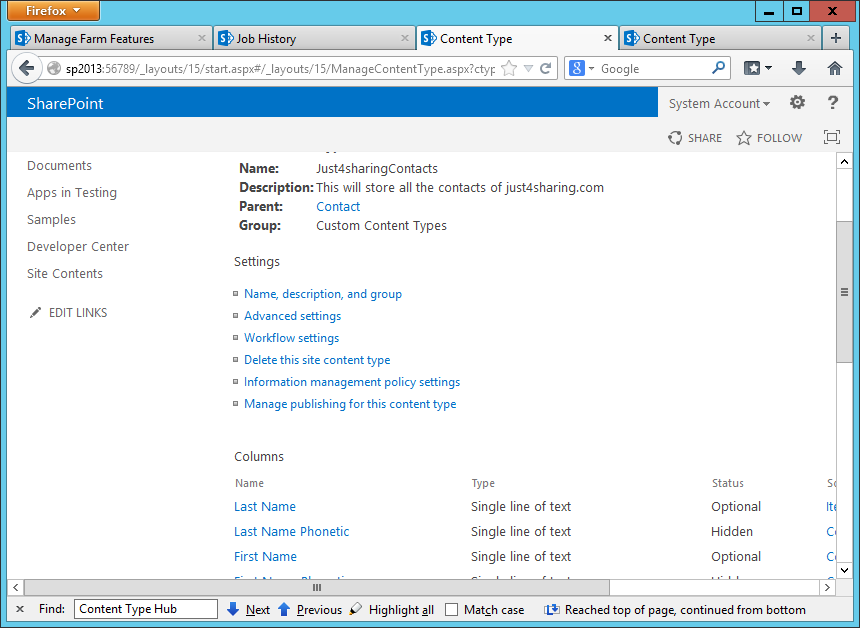
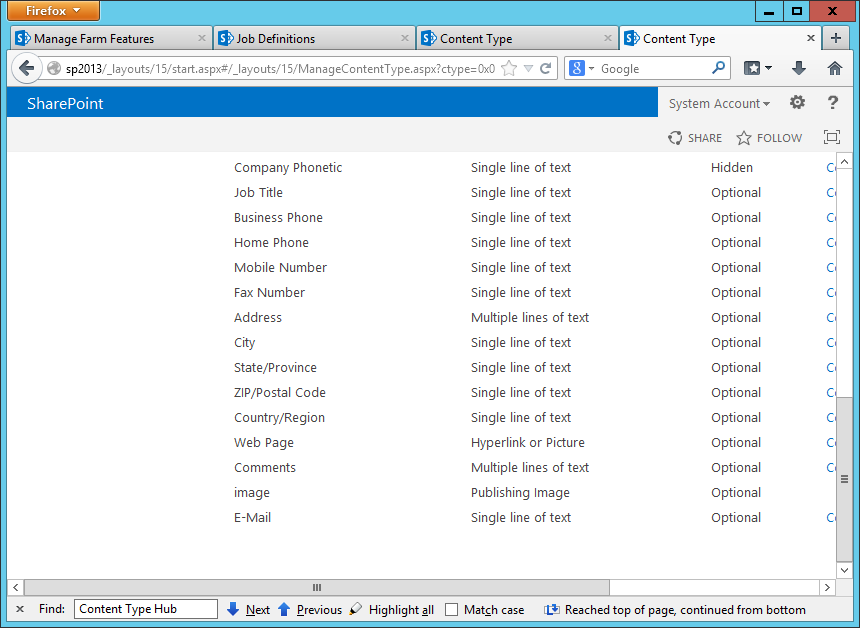
16. Modifying content type in Content Type Hub: Let us modify the content type in the Content Hub by adding a new column. New column “image” is added

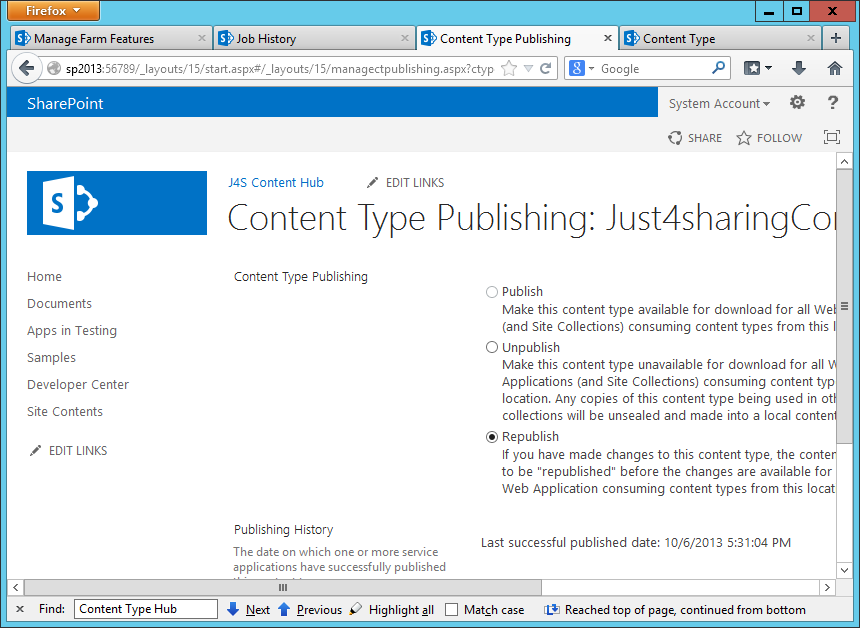
17. Republish
18. New field is available in the subscriber site collection
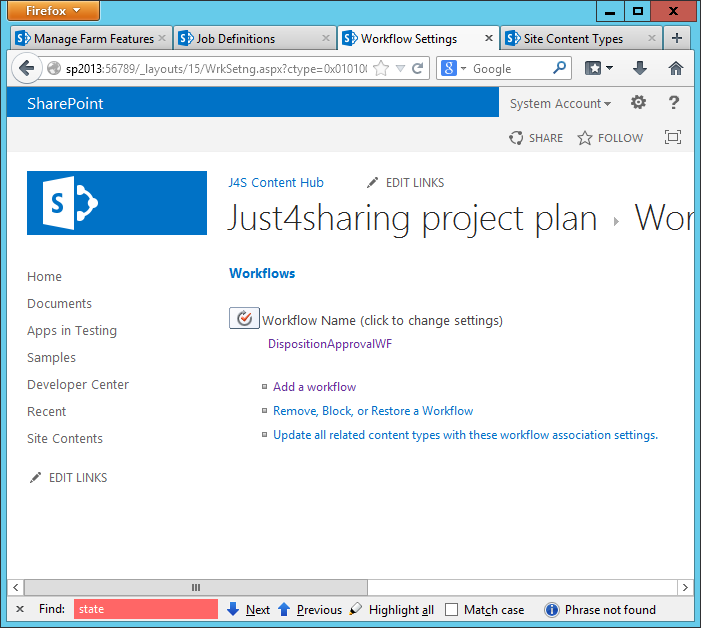
19. Workflow and Content Type Hub: Adding OOT workflow to the content Type Hub works fine. Example, here I am adding a disposition Workflow to the content which is in our discussion

20. Points to remember when you work with Custom workflow and Content Type Hub
Content Type Hub will not copy custom workflows to other Site Collections. You have to manually copy the workflow to the subscriber site collections. SharePoint Designer based workflow and also workflow created from visual studio, they all are working as expected given that I deployed these workflow to the subscriber site first before publishing the content type.

21. How you should approach publishing workflow with CTH
  • Create a workflow and associate it with your content type in the hub.
  • Before publishing this content type, export the reusable workflow and import it in all the subscriber site collections or deploy your workflow to the farm if it is a farm solution
  • Activate your workflow feature
  • Now, your workflow is available in the hub as well as all the subscriber site collections.
  • Publish the content type. The workflow association will be published.
Please leave a comment it really helped you. Also if you have anything to add, please update me @ tbijujoseph@gmail.com


References:


Wednesday, 25 September 2013

Customization of SharePoint Site Definition & what is the best way to do that?

Introduction
You can do customization on each of the sites created from the site definition OR you can customize the out of the box site definition itself. However, a SharePoint service pack upgrade would break any customization to out of box site definition. Then what is the best way to add customizations on out of box sites? How would you apply your customizations on multiple sites? The answer is Feature Stapling.

This article deals with various aspects of "Feature Stapling" in SharePoint 2010. We will see:

1. What Feature Stapling?

2. When to use Feature Stapling?

3. How to code Feature Stapling?

What is Feature Stapling?

Causes the attachment of a Feature to all new instances of sites that use a given site definition, without modifying the site definition or creating code routines to activate the Feature on each site. Also known as a feature site template association.

Real World Example

A developer creates a Feature and to add it to every new Web site that is based on a specific site definition. The developer creates a feature-stapling Feature that includes mappings between the Feature and site definition.
Technical Details

Feature stapling is implemented through a Feature that is specifically designed to staple other Features to one or more site definitions. Feature stapling allows a Feature to be stapled to any new sites created from any site definition or from specific site definitions based on the template name identified in the appropriate WEBTEMP.xml file.

Feature Stapling has two features. A "Stapler" feature which staples another feature to the site definition and the "Staplee" feature which will be stapled. Let's take an example to understand it. 

Scenario: You want to have custom list added to all of the "Team site" site definitions. This can be solved by creating a feature which will add the Custom list to the site and it can be associated with the Team site's site definition. 

How to associate feature with sites / site definition?

A Feature can be associated with the sites / site definition in three different ways:

1. You can create a site from that site definition and deploy your "custom list" feature to the site and activate it. 
2. If you already know all the required customizations before creating the site, you can include the features in the site definition (onet.xml) before you use it to create sites. 

3. If you want to automatically provision your feature when the user creates the site & you don't want to include it in the <SiteFeatures> or <WebFeatures> child elements of the <Configuration> element that represents the site definition configuration, you can use Feature Stapling. Another reason would be when you want to do customizations on out of the box site definitions, use of Feature Stapling.
1. This is self-explanatory 
2. Include the customization in site definitions. You can include the feature in the onet.xml file of site definition in <webfeatures> or <sitefeatures>. The section of the site definition which contains the web or site level features associated with it is shown below: 
  1. <Configuration ID="1" Name="Blank">  
  2.   <Lists />  
  3.   <Modules>  
  4.     <Module Name="DefaultBlank" />  
  5.   </Modules>  
  6.   <SiteFeatures>  
  7.     <!-- BasicWebParts Feature -->  
  8.     <Feature ID="00BFEA71-1C5E-4A24-B310-BA51C3EB7A57" />  
  9.     <!-- Three-state Workflow Feature -->  
  10.     <Feature ID="FDE5D850-671E-4143-950A-87B473922DC7" />  
  11.   </SiteFeatures>  
  12.   <WebFeatures>  
  13.     <Feature ID="00BFEA71-4EA5-48D4-A4AD-7EA5C011ABE5" />  
  14.     <!-- TeamCollab Feature -->  
  15.     <Feature ID="F41CC668-37E5-4743-B4A8-74D1DB3FD8A4" />  
  16.     <!-- MobilityRedirect -->  
  17.   </WebFeatures>  
  18. </Configuration>  
  
Here the ID in the feature tag is the Feature ID/ GUID. The Sitefeatures tag has features which will be activated when this site definition is used to create a site collection, whereas, the Webfeatures tag has features which will be activated when this site definition is used to create a web.

3. Feature Stapling: Feature Stapling is achieved through the creation of another feature ("stapler") that defines the association of your regular Feature (the feature carrying your "Custom list") and the site definition you want to "staple" it too. In other words, you need to create two Features to achieve a complete Feature Stapling implementation. This means you can add your "Custom list" feature to all Team sites.
A step by step guide to making a Feature Stapling with OFTB blank site definition:

Scenario: I want a custom list instance named "Blog ListInstance" to be added to every site create using the blank site template. This scenario can be achieved using feature stapling. In the demo, I will be using Visual Studio 2010 with SharePoint 2010 for this example

Step 1: Create an Empty SharePoint project:
 

Step 2: Make it a farm solution
 

Step 3: Add a list definition to the project 
 

Step 4:  Select the type of the list definition and add a list instance for the list definition
 

Step 5: Update the element.xml which is in the same level as ListInstance1. Change TempalateType ="10001"
 
  1. <?xml version="1.0" encoding="utf-8"?>  
  2.   
  3. <Elements xmlns="http://schemas.microsoft.com/sharepoint/">  
  4.   
  5.   <ListInstance Title="Blog - ListInstance1"  
  6.   
  7.                 OnQuickLaunch="TRUE"  
  8.   
  9.                 TemplateType="10001"  
  10.   
  11.                 Url="Lists/Blog-ListInstance1"  
  12.   
  13.                 Description="My List Instance">  
  14.   
  15.   </ListInstance>  
  16.   
  17. </Elements>  
Step 6: Make changes to element.xml which is in the same level of Blog(i.e. listdefinition), What we do here is
 

1. Add fields

2. Add Content type

3. Add fields to content type
  1. <?xml version="1.0" encoding="utf-8"?>  
  2. <Elements xmlns="http://schemas.microsoft.com/sharepoint/">    
  3.   <!-- Do not change the value of the Name attribute below. If it does not match the folder name of the List   
  4.        Definition project item, an error will occur when the project is run. -->    
  5.   <Field Type="Note"   
  6.          DisplayName="Description"   
  7.          Required="FALSE"   
  8.          NumLines="6"   
  9.          RichText="FALSE"   
  10.          Sortable="FALSE"   
  11.          ID="{cb55bba1-81a9-47b6-8e6c-6a7da1d25602}"   
  12.          StaticName="Blog Description"   
  13.          Name="Blog Description"   
  14.          Group="Custom Columns" />  
  15.   <Field Type="Text"   
  16.          DisplayName="Title"   
  17.          Required="FALSE"   
  18.          MaxLength="255"   
  19.          ID="{0248c82f-9136-4b3a-b802-d0b77280b3bc}"   
  20.          StaticName="BlogTitle"   
  21.          Name="BlogTitle"   
  22.          Group="Custom Columns" />  
  23.   <Field Type="Text"   
  24.          DisplayName="Writer"   
  25.          Required="FALSE"   
  26.          MaxLength="255"   
  27.          ID="{aa4a82dd-5b32-4507-9874-4e1c7bca3279}"   
  28.          StaticName="Writer"   
  29.          Name="Writer"   
  30.          Group="Custom Columns" />  
  31.     
  32.   <!-- content type-->  
  33.   <ContentType ID="0x010089E3E6DB8C9B4B3FBB980447E313CE94"    
  34.                Name="Blog Item"    
  35.                Group="Custom Content Types"   
  36.                Description="Blog item content type."    
  37.                Version="0">  
  38.     <!-- refer fields in the content type-->  
  39.     <FieldRefs>  
  40.       <FieldRef ID="{fa564e0f-0c70-4ab9-b863-0177e6ddd247}" />  
  41.       <FieldRef ID="{cb55bba1-81a9-47b6-8e6c-6a7da1d25602}" />  
  42.       <FieldRef ID="{0248c82f-9136-4b3a-b802-d0b77280b3bc}" />  
  43.       <FieldRef ID="{aa4a82dd-5b32-4507-9874-4e1c7bca3279}" />  
  44.     </FieldRefs>      
  45.   </ContentType>  
  46.     
  47.   <ListTemplate  
  48.     Name="Blog"  
  49.     Type="10001"  
  50.     DisallowContentTypes="FALSE"  
  51.     BaseType="0"  
  52.     OnQuickLaunch="TRUE"  
  53.     SecurityBits="11"  
  54.     Sequence="410"  
  55.     DisplayName="Blog"  
  56.     Description="My List Definition"  
  57.     Image="/_layouts/images/itgen.png"/>    
  58. </Elements>  

Step 7: Make changes to schema.xml to include content type, fields and View fields.
 
  1. <?xml version="1.0" encoding="utf-8"?>  
  2. <List xmlns:ows="Microsoft SharePoint" Title="MyFeatureStaplingDemo - Blog" 
  3. EnableContentTypes="TRUE" FolderCreation="FALSE" Direction="$Resources:Direction;" 
  4. Url="Lists/MyFeatureStaplingDemo-Blog" BaseType="0" 
  5. xmlns="http://schemas.microsoft.com/sharepoint/">  
  6.   <MetaData>  
  7.     <ContentTypes>  
  8.       <!-- mention content type-->  
  9.       <ContentTypeRef ID="0x010089E3E6DB8C9B4B3FBB980447E313CE94" />  
  10.       <ContentTypeRef ID="0x01">  
  11.         <Folder TargetName="Item" />  
  12.       </ContentTypeRef>  
  13.       <ContentTypeRef ID="0x0120" />  
  14.     </ContentTypes>  
  15.       
  16.     <Fields>  
  17.        <!--copy fiends in the content type-->  
  18.       <Field Type="Note"   
  19.              DisplayName="Description"   
  20.              Required="FALSE"   
  21.              NumLines="6"   
  22.              RichText="FALSE"   
  23.              Sortable="FALSE"   
  24.              ID="{cb55bba1-81a9-47b6-8e6c-6a7da1d25602}"   
  25.              StaticName="Blog Description"   
  26.              Name="Blog Description"   
  27.              Group="Custom Columns" />  
  28.       <Field Type="Text"   
  29.              DisplayName="Title"   
  30.              Required="FALSE"   
  31.              MaxLength="255"   
  32.              ID="{0248c82f-9136-4b3a-b802-d0b77280b3bc}"   
  33.              StaticName="BlogTitle" Name="BlogTitle"   
  34.              Group="Custom Columns" />  
  35.       <Field Type="Text" DisplayName="Writer"   
  36.              Required="FALSE" MaxLength="255"   
  37.              ID="{aa4a82dd-5b32-4507-9874-4e1c7bca3279}"   
  38.              StaticName="Writer" Name="Writer"   
  39.              Group="Custom Columns" />  
  40.     </Fields>  
  41.       
  42.     <Views>  
  43.       <View BaseViewID="0" Type="HTML" MobileView="TRUE" TabularView="FALSE">  
  44.         <Toolbar Type="Standard" />  
  45.         <XslLink Default="TRUE">main.xsl</XslLink>  
  46.         <RowLimit Paged="TRUE">30</RowLimit>  
  47.         <ViewFields>  
  48.           <!-- copy fields to the view-->  
  49.           <FieldRef Name="LinkTitleNoMenu"></FieldRef>  
  50.           <FieldRef Name="Attachments"></FieldRef>  
  51.           <FieldRef Name="LinkTitle"></FieldRef>  
  52.           <FieldRef Name="Blog Description"></FieldRef>  
  53.           <FieldRef Name="BlogTitle"></FieldRef>  
  54.           <FieldRef Name="Writer"></FieldRef>            
  55.         </ViewFields>  
  56.         <Query>  
  57.           <OrderBy>  
  58.             <FieldRef Name="Modified" Ascending="FALSE"></FieldRef>  
  59.           </OrderBy>  
  60.         </Query>  
  61.         <ParameterBindings>  
  62.           <ParameterBinding Name="AddNewAnnouncement" Location="Resource(wss,addnewitem)" />  
  63.           <ParameterBinding Name="NoAnnouncements" Location="Resource(wss,noXinviewofY_LIST)" />  
  64.           <ParameterBinding Name="NoAnnouncementsHowTo" Location="Resource(wss,noXinviewofY_ONET_HOME)" />  
  65.         </ParameterBindings>  
  66.       </View>  
  67.       <View BaseViewID="1" Type="HTML" WebPartZoneID="Main"                          DisplayName="$Resources:core,objectiv_schema_mwsidcamlidC24;" 
  68.         DefaultView="TRUE" MobileView="TRUE" MobileDefaultView="TRUE" 
  69.         SetupPath="pages\viewpage.aspx" ImageUrl="/_layouts/images/generic.png" Url="AllItems.aspx">  
  70.         <Toolbar Type="Standard" />  
  71.         <XslLink Default="TRUE">main.xsl</XslLink>  
  72.         <RowLimit Paged="TRUE">30</RowLimit>  
  73.         <ViewFields>  
  74.           <FieldRef Name="Attachments"></FieldRef>  
  75.           <FieldRef Name="LinkTitle"></FieldRef>  
  76.           <!--copy fields to the view-->  
  77.           <FieldRef Name="Blog Description"></FieldRef>  
  78.           <FieldRef Name="BlogTitle"></FieldRef>  
  79.           <FieldRef Name="Writer"></FieldRef>  
  80.         </ViewFields>  
  81.         <Query>  
  82.           <OrderBy>  
  83.             <FieldRef Name="ID"></FieldRef>  
  84.           </OrderBy>  
  85.         </Query>  
  86.         <ParameterBindings>  
  87.           <ParameterBinding Name="NoAnnouncements" Location="Resource(wss,noXinviewofY_LIST)" />  
  88.           <ParameterBinding Name="NoAnnouncementsHowTo" Location="Resource(wss,noXinviewofY_DEFAULT)" />  
  89.         </ParameterBindings>  
  90.       </View>  
  91.     </Views>  
  92.     <Forms>  
  93.       <Form Type="DisplayForm" Url="DispForm.aspx" SetupPath="pages\form.aspx" WebPartZoneID="Main" />  
  94.       <Form Type="EditForm" Url="EditForm.aspx" SetupPath="pages\form.aspx" WebPartZoneID="Main" />  
  95.       <Form Type="NewForm" Url="NewForm.aspx" SetupPath="pages\form.aspx" WebPartZoneID="Main" />  
  96.     </Forms>  
  97.   </MetaData>  
  98. </List>  

Step 8: Deploy to SharePoint and you can see the Blog - ListInstance1 in the quick launch bar. This list definition and list instance feature should be web scoped. 
 

Stapling a feature to Site definition 

Step 1: Add an empty element to the project. Open element.xml and add the binding of feature to whatever site definition you wanted. 
  1. <?xml version="1.0" encoding="utf-8"?>  
  2. <Elements xmlns="http://schemas.microsoft.com/sharepoint/">  
  3.   <!--this is stapling feature to Blank Site Tempaltes(STS#1)-->  
  4.   <FeatureSiteTemplateAssociation Id="099b30d7-6135-4b44-b1c8-20448d9e4b4b"   
  5.                                   TemplateName="STS#1" />  
  6. </Elements>  

Step 2: Create another feature scoping "farm" and add this element to it. 
 

Step 4: Create a site using blank site template and you are done. 
 

The solution looks like this: 
 
Hope this helps. Don't forget to leave a comment.

Ref: 
http://msdn.microsoft.com/en-us/library/bb861862(v=office.12).aspx
http://gallery.technet.microsoft.com/office/Feature-Stapling-in-fcbaf891
http://johanolivier.blogspot.in/2010/05/developing-list-definition-in.html 

Thursday, 29 August 2013

Setting up Secure Store Service (SSS) in SharePoint 2013

setting up Secure Store Service (SSS) in SharePoint 2013
Secure Store Service (SSS) in SharePoint
The Secure Store Service provides a more flexible and reliable solution to have Single Sign-On. It provides a secure storage of user names and passwords for shared resources and the mapping of users to specific access identities. It is commonly used for access to external data for Business Connectivity Services, Excel Service Applications and Visio Service Applications.
Need of Secure Store Service
When you want to use external data, such as data from your other business applications or partner resources) in SharePoint, you can use Business Connectivity Services (BCS) together with Secure Store Service. And, you can manage BCS and Secure Store right in the SharePoint admin centre. The external data source that you can connect to is called a Secure Store Target Application, or just a Target Application. BCS makes it possible for you to set up a connection to the Target Application, and the Secure Store enables you to manage the credentials that are required by the external data source.

Starting the Secure Store Service application
You can start Secure Store Service Application from the Central Administration itself. Please follow these steps
1.      Go to Central Admin
2.      Click on Manage Service on the Server
3.      Start Secure Store Service application 
               

Creating a secure store service application.
1.      From the ribbon, select “new” secure service application 
                 
2.       Supply values for all inputs 
Service Name: Enter the name of the Secure Store Service Application. The name entered here will be used in the list of Service Applications displayed in the Manage Service Applications page 
Database: Use of the default database server and database name is recommended for most cases. Refer to the administrator's guide for advanced scenarios where specifying database information is required. 
Authentication: Use of Windows authentication is strongly recommended. To use SQL authentication, specify the credentials which will be used to connect to the database. 
Application Pool: Choose the Application Pool to use for this Service Application.  This defines the account and credentials that will be used by this web service. 
Security Account: Select a security account for this application pool 
Enable Audit: Specifies if auditing should be enabled or disabled. With auditing enabled, all operations on the Secure Store Service Application are logged to the Secure Store database. Audit log will purge after the number of days specified.


Service application creation process is ready. Secure store service application and secure store service proxy are ready.
               

Next, click on the MySecureStore Service link
              

If this is the first time the Secure Store Service has been accessed, you will need to Generate New Key from the ribbon.
Creating a Secure Store Service Encryption Key
To generate a new key you must provide a pass phrase. This is used for encrypting information stored in the secure store so it is wise to choose a strong pass phrase.


At this point the Secure Store Service is ready for you to start adding the target applications that you want to store credentials for. For each application you want to access, do the following:

Creating a new Secure Store Target Application
Click on the New target application ribbon button:
Complete the Target Application Settings using the notes below:
                 

Required Fields in Secure Store Target Application Settings
Target Application ID: The target application id is the unique name of the application (and cannot be changed), although the display name can.
Contact e-mail: Self explanatory
Target Application Type: We get to the Target Application Type, the first choice to make is either:
Individual – meaning that each user connecting to SharePoint will be mapped to a unique set of credentials to connect to this target applications; or
Group – meaning that all users connecting to SharePoint in a specific group will be mapped to a shared set of credentials to connect to this target application.
Now we need to decide whether the type should be normal, Ticket, or Restricted.
Ticket – this applies to target applications who support ticket (or “claim”) based authentication.
Restricted – allows you to provide implementation specific additional authentication in the target application;
Normal – this is the more traditional method of providing authentication credentials (user name, password and maybe other information) with each connection.
I am interested at this point in a connection to SQL Server, and a single set of Windows logon credentials for all users is what I’m after, so I choose Group, and click Next.
Next I’m prompted to specify the authentication field names and type. The default of Windows User Name and Windows Password is exactly what I need
                  
Next I need to specify, who can administer this target application and who are the members of the group of users that will use these credentials:
               
Set Credentials for SharePoint users with SQL users


Secure Store and Secure Store Application is ready and you can use in your BCS applications.
Ref: http://office.microsoft.com/en-in/office365-sharepoint-online-enterprise-help/create-or-edit-a-secure-store-target-application-HA103516413.aspx